I've been on a jag making objects with wires lately (e.g.,earthquake detector, clay pot, stone pot). While making these objects my brain naturally considers variations--other methods, shapes, and objects. Sometimes a new and appealing idea just "pops" into my mind (i.e., my mind works something out and then kicks it into consciousness). That's part of where this rock figure project came from. The other two parts came from working hard on a backyard project--I put in six large posts to serve as a the frame for 4 trellace panels that will surround our wooden deck. Digging the posts holes yielded three to four dozen rocks from the ground. I collected these rocks as they were unearthed--and began thinkings about "doing something" with them. Putting in the posts (twelve foot long 4"x4" square wooden posts), pouring the cement, etc. was a very time consuming, attention consuming, energy consuming project and only increased my desire to reward myself with a smaller more fun and recreational project.
As soon as the weekend post project was over and cleaned up (early Sunday evening), I washed my new yard rocks and got ready to do something with them that night. The idea I started this project with was simply to wire a bunch of medium sized rocks together to make a small table-top sized clump, lump, or tower of rocks--no particular shape. I already knew that however the project turned out--just a big roundish lump of common rocks wired together--it was going to look cool to me (and to Janice). I also knew it was going to be a lot easier and quicker to just wire a bunch of rocks together than to fashion them into a shape (such as a stone pot) that would bring a lot of construction challenges with it. I knew wiring a clump of rocks together was going to be short and sweet project
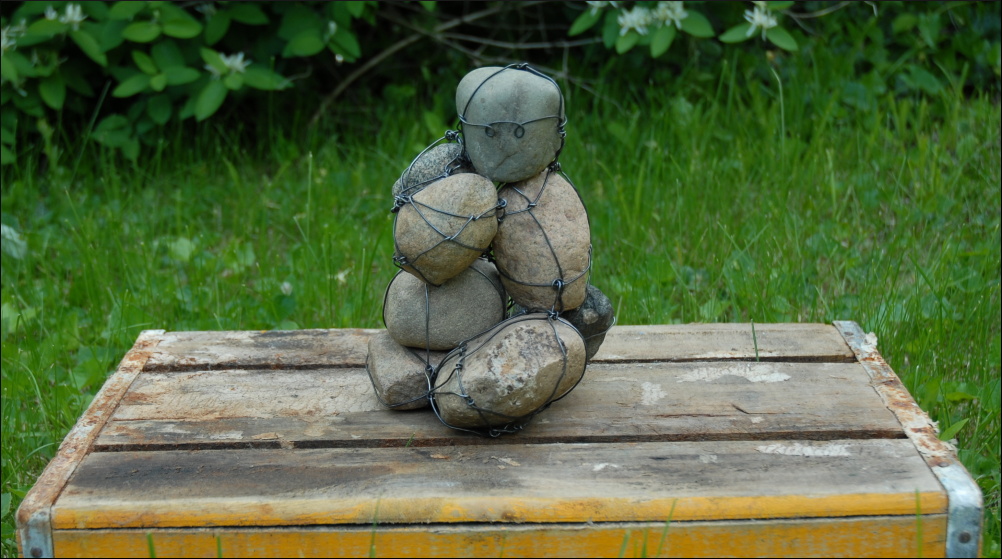
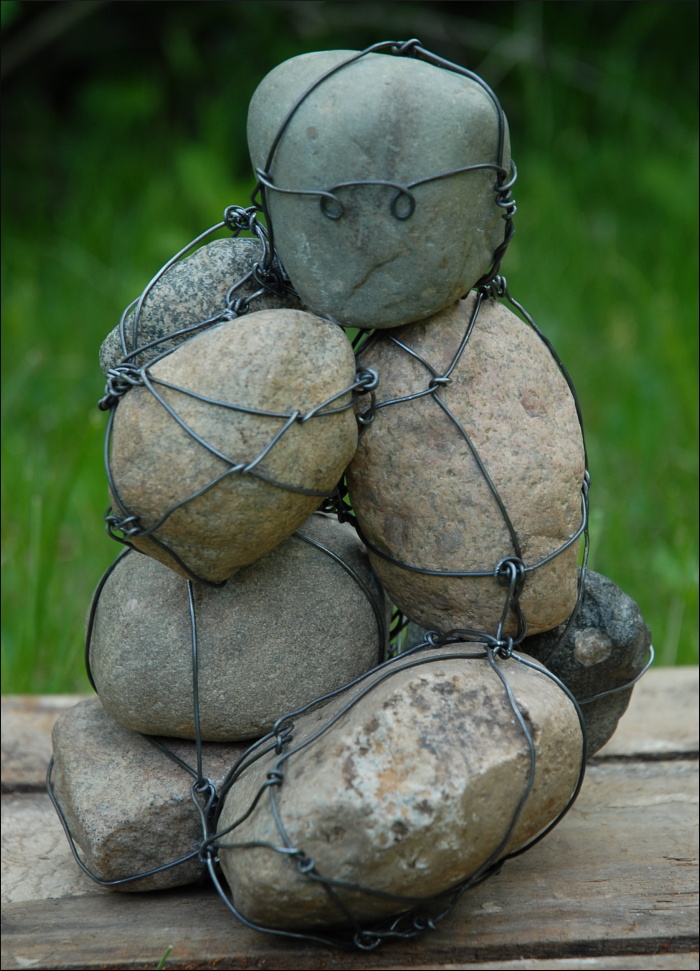
The idea to make this a "figurine" comes last. At one point--one rock short of the object you see here--I thought I was done. I had even started to trim off the excess wires and clean up my work space. I kept admiring my quick creation, but started wondering if maybe it wasn't big enough--maybe I should add some more rocks. I started picking up different rocks and holding them up to the sculpture in various positions and asking myself "Would it look better if this rock were here?" While working with the bluish green rock that now sits atop the object, I discovered that this rock would sit on top in a pretty natural way. Then I noticed that it sort of looked like a head and transformed the whole piece into what could be a figurine. I sort of liked this discovery, but also started worrying that this was all too "cutesy"...may be better to leave the object as an abstract clump of rocks than turn it into a doll. I moved the rock around wondering which side would be the best "face" when I realized that one flatish side already had a circle for an eye, a bump for a nose, and a diagonal line below that that looked liked a rackish grin or scowl. I thought this was both appealing but also even more "too cutesy." I couldn't decide whether to add this rock face or not, but decided to wire it in and see what it looked like. I didn't want to obsure the natural rock face too much with the wire, but knew I needed to wrap at least one wire across the fact of the rock. I got some inspiration--I took a cue from the cirlce that made one of the eyes and made two loops in the wire to represent the eyes...adding a wire that enchanced rather than obscured the face. I knew that this was really going overboard on the cute...and once again I failed to resist the allure of "the cute." [Aren't serious objects of greater value and respect than "cute" objects?--one of the great neurotic dilimmas and self-criticisms that plagues me while working on projects like this.] After wiring the head rock on, I decided that it just fit too well, that it was a natural discovery that was too good to ignore, so I immediately surrendered to and embraced my new little figurine. Janice examined the object the next morning and suggested that it was a "self-portrait" seeing the wire eyes as being my glasses.